
Hi Friend, today we will learn "How to host your WCF services on your local Network and access it through your client application". If your computer is connected with more than one computers through LAN ,then you can access your wcf services on other computers also. But You have to make this computer as a server where your WCF services are hosted.You can access this Network ( local host) services from the other computers also. Now You can Host your WCF Client application on IIS server also.So that you can access it like this URL:-http://localhost:49864/Wcf_clientapps/ on other computers . Same concepts are used on virtual server also. Here You can host your services on server.and host your client application on same server or different servers.But here you can access it like this URL http://www.myserverice.com/ . both concepts are same, so here we will learn, how to access your wcf services on your local networks or local computers. You have to understand the concepts of address Format concepts of WCF.
We will learn this concepts in Four parts :-
1.) Creating WCF Services :-We will learn this concepts in Four parts :-
- Creating WCF Services
- Configuring a WCF Services
- Deploying WCF Services
- Building WCF Client Application
First create a WCF service, Follow Step 1 to Step 5 from here.
2.) Configuring a WCF Services :-
After creating a services the Next Step is to configure the service. Configuring WCF services includes defining ABC for the services.
Step 1:- Now Open Solution Explorer in Your WCF Services --> Open Web.Config File -->write following codes for defining the end point a given below:-
<?xml version="1.0"?>
<configuration>
  <system.web>
    <compilation debug="true" targetFramework="4.0"/>
  </system.web>
  <system.serviceModel>
    <services>
      <service name="Service" behaviorConfiguration="ServiceBehavior">
        <!--Service Endpoints-->
        <endpoint address="" binding="wsHttpBinding" contract="Istudent_data">
          <!-- Upon deployment, the following identity element should be removed or
    replaced to reflect the
   identity under which the deployed service runs.  If removed, WCF will
    infer an appropriate identity
   automatically.-->
          <identity>
            <dns value="localhost"/>
          </identity>
        </endpoint>
        <endpoint address="mex" binding="mexHttpBinding" contract="IMetadataExchange"/>
      </service>
    </services>
    <behaviors>
      <serviceBehaviors>
        <behavior name="ServiceBehavior">
          <!-- To avoid disclosing metadata information, set the value below to false and remove the metadata endpoint above before deployment -->
          <serviceMetadata httpGetEnabled="true"/>
          <!-- To receive exception details in faults for debugging purposes, set the value below to true.  Set to false before deployment to avoid disclosing exception information -->
          <serviceDebug includeExceptionDetailInFaults="false"/>
        </behavior>
      </serviceBehaviors>
    </behaviors>
    <serviceHostingEnvironment multipleSiteBindingsEnabled="true"/>
  </system.serviceModel>
  <system.webServer>
    <modules runAllManagedModulesForAllRequests="true"/>
  </system.webServer>
</configuration>
contract="Istudent_data"
Step 2:- Now Run the Application(Press F5) --> You will see Following Output as shown below:-

Step 3:-Now create a client using the svcutil.exe tool from the Visual studio command line. Now open the Visual studio 2010 Command Prompt in Administrative mode(Right click's on Visual studio 2010 Command Prompt and Run as Administrator)--> now Copy Above URL with svcutil.exe tool(
svcutil.exe http://localhost:49768/WCFService2/Service.svc?wsdl )--> Now press Enter Button -->then you will see , two files service.cs and output.config are created in your c drive as shown below:-
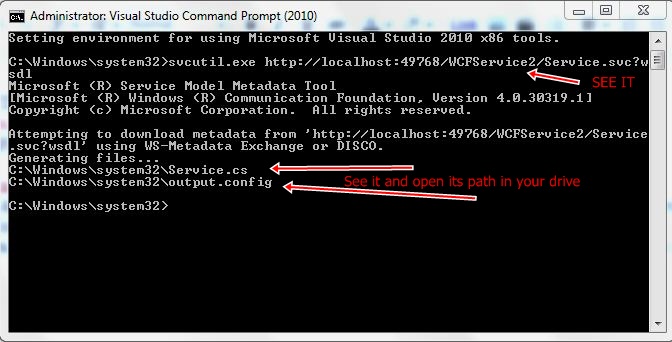
Step 4:- Now go Your Drive Path as shown in above image --> Copy these two files (service.cs and output.config) and paste it on your desktop or a separate folder (we will use it when we will configure the WCF client application).

3.) Deploying WCF Services :-
After configuring a WCF service, the Next step is to make the web service available to other web application over the server.To make service available to other applications , we need to install wcf services on the server or local host network.
Step 1:- Now Open your WCF Service application on your visual studio -->Click File-->Add-->New Project.. as shown below:-

Step 2:- Now press Visual studio installer from the left window-->Select Setup Project-->Write your setup Name --> After that press OK Button as shown below:-

Step 3:- Now Right click on Application Folder-->Add-->Project Output..-->Add Project Output Group Dialog box will be opened --> Press OK button as shown below:-

Step 4:- Now Right Click on wcf_service setup--> Press Build Button --> Wait few minute , then your setup will be built as shown below:-

Step 5:- When you build the wcf_service setup project,two folders,Debug and Release ,are added to the wcf_service setup Folder.The Debug Folder contains two files, setup.exe , wcf_service setup.exe as shown below:-

Step 6:- Now Run the Setup.exe file as shown below :-

Step 7:- Press Next Button as shown below:-

Step 8:- Now Press Next Button and Confirm installation as shown below:-


Step 9:-Now check setup is install or Not on your computer ,open Control panel see your setup is install or not as shown below:-

4.) Building WCF Clients:-
After creating the wcf service,we can use the wcf service in a web application.To use a wcf service in web application, we have to build WCF Client.
Step 1:- First create WCF Client Application Follow Step 6 to Step 9 From Here .
Step 2:- Open Solution Explorer Window --> Create a folder, App_Code and Add (paste) Service.cs file in this folder(See Step 4 in Configuring a WCF Services )as shown below:-

Step 3:- Again Open Solution Explorer Window -->first Delete Web.config File-->After that Paste Output.config file in solution explorer (See Step 4 in Configuring a WCF Services )--> Now Rename Output.config =Web.config as show below:-

Step 4:- Now Remove ServiceReference1 from your Default.asps.cs file if available. See the correct c# coding of WCF Client page as given below:-
using System;
using System.Web;
using System.Web.UI;
using System.Web.UI.WebControls;

public partial class _Default : System.Web.UI.Page
{
   Istudent_dataClient obj = new Istudent_dataClient();
    protected void Page_Load(object sender, EventArgs e)
    {
        string str = obj.mywebsite().ToString();
        Label1.Text = str;
    }
    protected void Button1_Click(object sender, EventArgs e)
    {
        float area1 = obj.rect_area(Convert.ToInt32(TextBox1.Text), Convert.ToInt32(TextBox2.Text));
        Label2.Text = "Rectangle Area = " + area1;

    }
    protected void Button2_Click(object sender, EventArgs e)
    {
        int mult = obj.multiplication(Convert.ToInt32(TextBox1.Text), Convert.ToInt32(TextBox2.Text));
        Label2.Text = "Multiplication of two Nubmer is= " + mult;
    }
    protected void Button3_Click(object sender, EventArgs e)
    {
        student st = obj.GetData();
        Label2.Text = "id is: " + st.id.ToString() + "and name is: " + st.sname;
    }
}
Step 5:- Now, Before starting the WCF Client Application,you have start WCF service first,To start your wcf service you have to run your wcf service application once or type URL http://localhost:49768/WCFService2/Service.svc in your browser and open it,this is two ways to start your wcf services on your local server -->Now Run the WCF Client Application -->You will see following output as shown below:-

Note:- Remember one things, You will have to start your wcf services on your local computer first.Otherwise your WCF Client application shows an error message. To start your wcf services on your local computer you have to Remember this Below URL
http://localhost:49768/WCFService2/Service.svc
This Port Number=49768 will be different for other computers.
For More...
- FileHandling Real concepts
- How to create Crystal Report in your visual studio easily
- How to build your own media player and install it on your desktop
- How to implement route constraints concepts in mvc
- How to build photo gallery like google+ and facebook in asp.net
- How tomake form filling application like IBPS
- How tocreate a calculator application and install it to others computer
DownLoad DownLoad
Your work will bring a lot of insights into solving our next problem.
ReplyDeletelocal network