Hi Friends ! Today ,I will Show to "How to Implement XAML Concepts in WPF Applications".
What is XAML?
What is XAML?
- XAML Stands for Extensible Application Markup Language.
- XAML is a declarative XML- based Language that defines objects and their Properties in XML.
- XAML can be used to create visible UI elements in the declarative XAML markup.
- XAML files are xml files that generally represent the .xaml extension.
- XAML is a flexible Language that can be used designing and programming purpose at a time.
- XAML Parser instantiates and writes up the objects using appropriate API and sets their properties.
- If we use XAML with Avalon then Procedural code (code behind) is separate from user interface (UI).
- We can use XAML Language in WPF,SilverLight and WF .NET Technologies.
- XAML is Very powerful binding Technologies.
- Graphical designer tools are used XAML language (ex. Blend).
- XAML Code is flexible and short.
- XAML code is used for designing and Business logic codes.
There are two main ways to write the XAML Codes in WPF Applications as given below:-
1.) Property Syntax:-
<Button Name="bt" Content="Submit" Height="30" Width="90" FontWeight="Bold" Background="SkyBlue" />
2.) Attribute element Syntax:-
<Button.Content> Submit </Button.Content>
            <Button.Height> 30</Button.Height>
            <Button.Width>90</Button.Width>
           Button.FontWeight>Bold</Button.FontWeight>
            <Button.Background>
                <LinearGradientBrush>
                    <GradientStop Color="SkyBlue" Offset="1"/>
                </LinearGradientBrush>
            </Button.Background>
        </Button>
Description:-
- We can use Attribute Syntax and Property element Syntax in XAML codes. Some times we can't write Attribute syntax in XAML Codes , at that time we use Property element Syntax.
- In above example i have set Background as a LinearGradientBrush so here i have used Attribute element syntax.
WPF Application contains Following files:-
- MainWindow.XAML
- MainWindow.XAML.CS
- App.XAML
- App.XAML.CS
When we compile the WPF Application compiler covert the XAML File to BAML (Binary Application Markup Language) and C# file to g.cs file .You can see this whole compiled files in below image as shown below:-
Descriptions:-
Here WPF Files convert as a following ways using compiler as given below:-
MainWindow.xaml ------> MainWindow.baml
MainWindow.xaml.cs ------->MainWindow.g.cs
Graphical representation of Compilation process of XAML File in WPF :-
Descriptions:-
When XAML to BAML compilation process(by xamic.exe compiler) is finished,visual studio use the appropriate language compiler to compile the codes(in case c# use csc.exe compiler.) and generate the Partial class codes.After that Compiled codes combine in a single unit code that is called assembly file.
BAML :-
- BAML stands for Binary Application Markup Language
- It is the Binary representation of XAML.
- It is more efficient than other.
- BAML is not like Microsoft intermediate Language(MSIL).It is a Compressed declarative format that is faster to load and parse than plain XAML.
- BAML is just an implementation detail without any direct public Exposure,so it could be replaced with different in the Future.
- BAML is very smaller in size than XAML.
When open App.xaml file in your wpf project, you will see the following codes as given below:-
<Application x:Class="WpfApplication5.App"
             xmlns="http://schemas.microsoft.com/winfx/2006/xaml/presentation"
             xmlns:x="http://schemas.microsoft.com/winfx/2006/xaml"
             StartupUri="MainWindow.xaml">
    <Application.Resources>

    </Application.Resources>
</Application>
App.xaml.cs file codes:-
using System;
using System.Collections.Generic;
using System.Configuration;
using System.Data;
using System.Linq;
using System.Windows;

namespace WpfApplication5
{
    /// <summary>
    /// Interaction logic for App.xaml
    /// </summary>
    public partial class App : Application
    {

    }
}
<Window x:Class="WpfApplication5.MainWindow"
        xmlns="http://schemas.microsoft.com/winfx/2006/xaml/presentation"
        xmlns:x="http://schemas.microsoft.com/winfx/2006/xaml"
</Window>Descriptions:-
- http://schemas.microsoft.com/winfx/2006/xaml/presentation It is used to map the all WPF controls in System.Window.Controls.
- http://schemas.microsoft.com/winfx/2006/xaml It defines the XAML keywords.This Namespace is used to map XML namespace and a CLR namespace by xml definition attribute at assembly level.
There are some steps to build a simple WPF application in Visual studio 2010 as given below:-
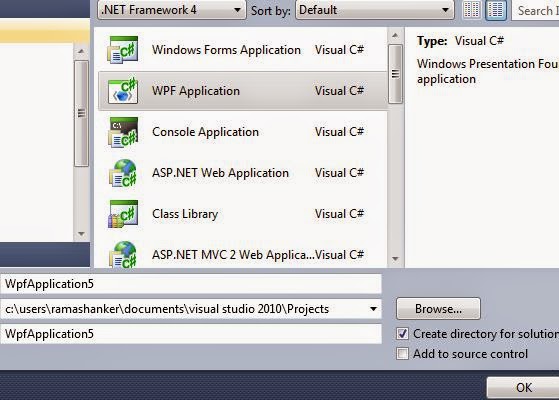
Step 1:- First open your visual studio --> File -->New --> Project --> Select WPF Application --> Press OK as shown below:-
Step 2:- Now open MainWindow.xaml From Solution Explorer--> Now create Label and Button control using XAML as shown below:-
<Window x:Class="WpfApplication5.MainWindow"
        xmlns="http://schemas.microsoft.com/winfx/2006/xaml/presentation"
        xmlns:x="http://schemas.microsoft.com/winfx/2006/xaml"
        Title="MainWindow" Height="391" Width="839">
    <Grid>
        <Label Content="Hello Friends! How are you.." FontWeight="Bold" FontFamily="Verdana" Height="35"  HorizontalAlignment="Left" Margin="159,36,0,0" Name="label1" Background="SkyBlue" VerticalAlignment="Top" Width="199" />
        <Button Content="Submit" FontSize="15" FontWeight="Bold" Height="39" HorizontalAlignment="Left" Margin="223,120,0,0" Name="button1" VerticalAlignment="Top" Width="80" Click="button1_Click" />
    </Grid>
</Window>
Step 4:- If you want to build same Label and Button control and other, using code behind -->Open Solution Explorer --> After that open MainWindow.xaml.cs file --> Write the following codes as given below:-
using System;
using System.Text;
using System.Windows;
using System.Windows.Controls;
using System.Windows.Data;
using System.Windows.Documents;
using System.Windows.Input;
using System.Windows.Media;
using System.Windows.Media.Imaging;
using System.Windows.Navigation;
using System.Windows.Shapes;

namespace WpfApplication5
{
    /// <summary>
    /// Interaction logic for MainWindow.xaml
    /// </summary>
    public partial class MainWindow : Window
    {
        public MainWindow()
        {
          //create label and set its contents and backgrownd color;
            Grid grid_obj = new Grid();
            Label l1 = new Label();
            l1.Name = "Label1";
            l1.Content = "Hello Friends! How are you..";
            l1.Background = new SolidColorBrush(Colors.SkyBlue);
            l1.Foreground = new SolidColorBrush(Colors.Red);
            l1.FontWeight = FontWeights.Bold;
           l1.Margin = new Thickness(60, 30, 40, 30);

            Grid.SetRow(l1,0);
            grid_obj.Children.Add(l1);

 // create label and set its contents and backgrownd color;
            Button b1 = new Button();
            b1.Name = "Button1";
            b1.Content = "Submit";
            b1.Width = 200;
            b1.Height = 80;
            Grid.SetColumn(b1, 0);
            Grid.SetRow(b1, 0);
            b1.Background = new SolidColorBrush(Colors.SkyBlue);
            grid_obj.Children.Add(b1);
            this.AddChild(grid_obj);
        }
        private void button1_Click(object sender, RoutedEventArgs e)
        {
            StackPanel st = new StackPanel();
            this.Content = st;
            Button bt = new Button();
            bt.Content = "OK";
            bt.Background = new SolidColorBrush(Colors.SkyBlue);
            bt.Width = 100;
            bt.Height = 50;
            st.Children.Add(bt);

        }
    }
}
- Here i have created same button and Label controls using c# which i have already created in XAML Language.
- I have created another button (OK) on Submit button 's clicks using stackpanel.
Step 6:- Now Press Submit Button --> You will see the output as shown below:-
Note:-
- You can build a simple WPF application from above tutorial. I have putted all basics concepts of WPF Technology in this tutorial so that students can easily understand the concepts of WFP. I will published other concepts also in our coming post.
- You can easily download whole application from below link and run it on your visual studio.
Download Attached File
Download


0 comments:
Post a Comment