Xcopy is used to deploy an application by copying a set of files to a folder on the target computer and then execute the application on the client.The xcopy deployment technique
deploys a fully functional application by simply copying the assemblies to the target computer.The xcopy deployment technique can also work with web applications with the exception of the folder structure,which that the files are copied to a virtual directory that you have setup for your web application.Here you can see How deploy your web application using Windows Installer technique.
There are some options of the XCopy Command as follows:-
1.) /E:-It copies directories, sub-directories and files including empty ones.
2.) /S:-It copies directories ,sub-directories and files excluding empty ones
3.) /R:-It is used to overwrites read only files.
4.) /O:-It is used to copy security-related information such as file ownership and Access Control(ACL) Information.
5.) /K:-It copies attributes and normal xcopy will reset read-only attributes.
6.) /H:-It copies directories and sub-directories including hidden and system files.
7.) /I:-It assumes the destination as a directory and creates if it does not exist.
8.) /C:-It continues copying even if an error occurs.
There are some steps to implement this concepts as given below:-
Step 1:- First open CMD Command Prompt in your Windows ,for this first Go Start menu-->Type cmd and press Enter button as shown below:-deploys a fully functional application by simply copying the assemblies to the target computer.The xcopy deployment technique can also work with web applications with the exception of the folder structure,which that the files are copied to a virtual directory that you have setup for your web application.Here you can see How deploy your web application using Windows Installer technique.
There are some options of the XCopy Command as follows:-
1.) /E:-It copies directories, sub-directories and files including empty ones.
2.) /S:-It copies directories ,sub-directories and files excluding empty ones
3.) /R:-It is used to overwrites read only files.
4.) /O:-It is used to copy security-related information such as file ownership and Access Control(ACL) Information.
5.) /K:-It copies attributes and normal xcopy will reset read-only attributes.
6.) /H:-It copies directories and sub-directories including hidden and system files.
7.) /I:-It assumes the destination as a directory and creates if it does not exist.
8.) /C:-It continues copying even if an error occurs.
There are some steps to implement this concepts as given below:-
Step 2:- Type Below commands on your cmd as shown below:-
C:\>xcopy /i /s C:\Users\Public\WebSite4 E:\msdotnet
Note:-
- Here i have copied C drive File WebSite4 to E:/ Drive, Folder msdotnet.
- The /I parameter allows the XCopy command to create the destination folder if it does not exist.Now you can run your web application from its new location.
- Now you have to create a virtual directory on target server and map that virtual directory to the physical directory that is created by the XCopy command after the folder is copied to the target server.
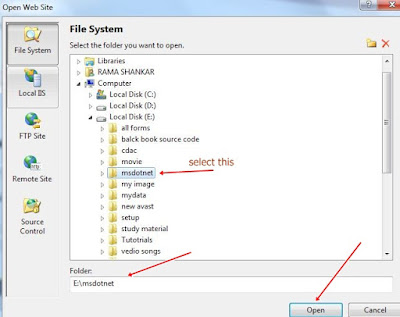
Step 1:- First open Your Visual studio --> File --> Open -->Web Site..-->select msdotnet folder in E:/ drive as shown below:-
Step 2:- Now open Solution Explorer --> Open ASP.NET Configuration Tool Icon as shown below:-
Step 3:- Now, You will see that your server is star running as shown in below:-
Note :-When you will restart your server,the server running port will be changed.
Step 4:-Now Type This URL (http://localhost:51637/msdotnet/)in your Web Browser -->You will see following output as shown below:-
Note:-
If your computer is connected with other computers with the help of LAN.Then you can access this web page from other computers also by typing these URL in web Browsers.But Server should be ON.
For More..


0 comments:
Post a Comment