
Navigation controls are very important for websites.Navigation controls are basically used to navigate the user through webpage .It is more helpful for making the navigation of pages easier .There are three controls in ASP.NET ,Which are used for Navigation on the webpage.


<?xml version="1.0" encoding="utf-8" ?>
There are some Namespaces, which are used for above Navigation controls which are given below:
Using.System.Web.UI.WebControls.TreeView ;
Using.System.Web.UI.WebControls.Menu ;
Using.System.Web.UI.WebControls.SiteMapPath ;
In this tutorial,i will show you ,how to add navigation control on the web page.I will also give you real example of each control.Please read each control very carefully and use it on ASP.NET website.You can download each control application from bottom and implement on your system.
1. ) The TreeView Control:-
The TreeView control is used for logically displaying the data in a hierarchical structure.We can use this navigation control for displaying the files and folders on the webpage.W can easily display the XML document,Web.SiteMap files and Database records in a tree structure.
There are some types to generate navigation on webpage through TreeView control.
There are some types to generate navigation on webpage through TreeView control.
- TreeView Node Editor dialog box
- Generate TreeView based on XML Data
- Generate TreeView based on Web.SiteMap data
- Generate TreeView from Database.
1.1) TreeView Node Editor dialog box:-
There are some steps to generate the Tree structure on the page,which are given below:
Step 1: First open your visual studio-->File-->New-->Website-->Select ASP.NET Empty Website -->OK-->open solution explorer-->Add New Web Form-->Drag and Drop TreeView control from Toolbox as sown below:
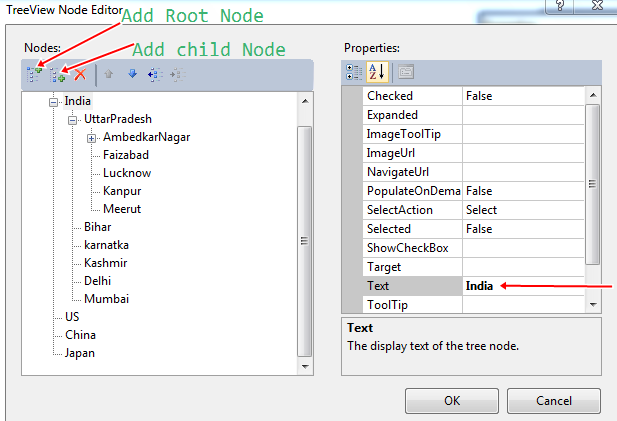
Step 2: Now go properties of TreeView control-->Click Nodes-->Add Root and child Node as shown below:
Step 3: Now Run the Program(press F5).
output:

1.2 ) Generate TreeView based on XML Data:-
There are some steps to implement this concepts on the webpage,which are given below:
Step 1: Now first Add a web Form and a XML File in Your solution Explorer-->Now open the XML file and write the following codes as shown below-->Now click save.
<application>
<homepage title="Country" value="default.aspx">
<page title ="INDIA" value="default.aspx">
<subpage title ="up" value="default.aspx"/>
<subpage title ="delhi" value="default.aspx"/>
<subpage title ="mumbai" value="default.aspx"/>
<subpage title ="kolkata" value="default.aspx"/>
</page>
<page title ="US" value="default.aspx"/>
<page title ="CHNIA" value="default.aspx"/>
<page title ="JAPAN" value="default.aspx"/>
</homepage>
</application>

Step 3:Now select XML File as shown below:-->OK.

Step 4: Now Browse your XML File as shown below-->OK

Step 5: Now click Edit TreeNode DataBindings..-->Select each page one by one -->and click Add button -->set TextField =title from right side for each page-->click Apply as sown below:

Step 6: Now Run the program(press F5).
Output:

1.3 ) Generate TreeView based on Sitemap Data:-
Step 1: First Add a Web Form and a SiteMap in Solution Explorer as shown below-->Add

<?xml version="1.0" encoding="utf-8" ?>
<siteMap xmlns="http://schemas.microsoft.com/AspNet/SiteMap-File-1.0" >
<siteMapNode url="default.aspx" title="Contury" description="">
<siteMapNode url="treeview1.aspx" title="India" description="" />
<siteMapNode url="menu.aspx" title="Us" description="" />
<siteMapNode url="menu1.aspx" title="China" description="" />
</siteMapNode>
</siteMap>


Step 5: Now Run the program(press F5).
OUTPUT:

2. ) The Menu Control:-
The menu control is a Navigation control,which is used to display the site navigation information .This can be used to display the site data structure vertically and horizontally.It can be used a binding control as TreeView control.Means we can easily bind the XML and SiteMap data in menu control.The menu control can be used as two types.
- Static menu:- It is used to display the parent menu items and their sub menu items on the page.Means it is used to display the entire structure of the static menu.
- Dynamic menu:- It is used to display the static menu as well as dynamic menu on the site.it Means when user passes the mouse over the menu then it will appear on the site.
2.1 ) static Menu:-
We can display site structure vertically as well as horizontally through static menu control on the site.There are some steps to implement the static menu control on the Web Form.Which are given below:Step 1: First Add a New Web Form in solution Explorer -->drag and drop menu control on the Form-->now select Views = static as shown below:

Step 2: Now click Edit Menu Items...-->Add parent and child nodes as shown below:

Step 3: Now Run the program(press F5).
Output:-

2.2 ) Dynamic Menu:-
When user passes the mouse over the control ,the data will automatically appear on the site.we can generate dynamic menu control in two ways:
- Generate menu control using Xml Data source
- Generate menu control using SiteMap Data source
Step 1: First Add a Web Form in the solution Explorer-->Drag and drop menu control on the Form -->choose Data Source -->Select XML File-->OK-->Browse XML File-->OK.

Step 2: Now click Edit TreeNode DataBindings..-->Select each page one by one -->and click Add button -->set TextField =title from right side for each page-->click Apply as sown below:
Step 3: Now Run the program(press F5).
Output:-

3. ) The SiteMapPath Control:
The SiteMapPath control is also used to display the Navigation information on the site.It display the current page's context within the entire structure of a website.There are some steps to implement the SiteMapPath control on the web page.Which are given below:
Step 1: First open your visual studio -->File -->New-->Website-->Select ASP.NET Empty Website-->Open solution Explorer-->Add a Web Form (SiteMap.aspx)-->Now again Add Site Map File in solution Explorer-->open web.sitmap file-->write the following codes , which are given below:
<?xml version="1.0" encoding="utf-8" ?>
<siteMap xmlns="http://schemas.microsoft.com/AspNet/SiteMap-File-1.0" >
<siteMapNode url="SiteMap.aspx" title="Country" description="">
<siteMapNode url="page1.aspx" title="India" description="" />
<siteMapNode url="page2.aspx" title="China" description="" />
<siteMapNode url="page3.aspx" title="US" description="" />
</siteMapNode>
</siteMap>

Step 3: Now Add three more Web Form (page1.aspx ,page2.aspx, page3.aspx) in Solution Explorer-->Go properties of HyperLink Button control -->set NavigateUrl-->Write Text Information ,as shown below:

Step 4: Now Go page1.aspx -->drag and drop SiteMapPath control and HyperLink control on the Form as shown below-->Set the NavigateUrl of each HyperLink control as previous i have done.

Step 5: Now Go page2.aspx -->Same steps perform as step 4.

Step 6: Now Go page3.aspx -->Same steps perform as step 4 and step 5.

Step 7: Now Run the program(press F5).
Output:-

Note:-Download Whole application from bottom and Run it on your system.
For More:-
- Web Form control (I)
- Web Form control (II)
- Create Setup File with .mdf Database
- Host ASP.NET application on server Free
- Ado.Net Application
- How to use secure login page in asp.net with example
- How to Add and verify Captcha image in 3 tier architecture in asp.net
- How to use virtual keyboard in asp.net for security purpose
- How to implement hashing concepts in asp.net
- Learn complete .Net Interview Questions and answers for job seekers
To Get the Latest Free Updates Subscribe
Click below for download whole application
Download
Wow nice post. I like your post because i found very good information on your blog. Thanks for sharing more information.
ReplyDeletenice information.but i have a question.
ReplyDeleteSuppose i am working for a dynamic website.and i want to add a sitemappath to the master page. the project has a database which store some info of Indian people like name, country, State, phone number.
now i want to show a sitemap path like
"home>>India>>Delhi>>Rama Shankar"
where all info of Rama Shankar has exist to the database.
please help me how it will do in asp.net in C#.
How to bind sitemap path with treeview??
ReplyDelete