
All Asp.Net Controls are very useful for Making a Real Time Application in .NET.In previous Tutorials I have discussed more details on Web Forms Controls in ASP.NET(I) with one Real Application.Now i am going to explain remaining important web forms controls in ASP.NET with a real application.There are some controls :-
- The ListBox control
- The DropDownList control
- The BulletedList control
- The Hyperlink control
- The Link Button control
- The checkBox control
- The checkBoxList control
- The RadioButton Control
- The RadioButtonList control
- The calendar control
- The AdRotator control
Note:- All the above web Forms controls resides within the following Namespace which is given below:-
using System.Web.UI.WebControls;
1.) The ListBox control:-
The ListBox control is a web server control,which is used to select one or more items from a list of items on a web page at Runtime in ASP.NET.
There are some important properties of the List Box Control.
Property Description
There are some important properties of the List Box Control.
Property Description
BorderWidth It is used to set the border width of the control
Bordercolor It is used to set the border color of the control
SelectionMode It is used to set the Selection mode of the control
Rows It is used to set the Number of Rows display in the control
BorderStyle It is used to set the Border style of the control.
There are some steps to implement this control please follow it.
Step: 1 Open your visual studio-->File -->New-->Website-->ASP.NET Empty website-->OK-->Open your Solution Explorer-->add New Web form-->Drag and Drop Label,Button and ListBox control on web form from Toolbox as shown below:

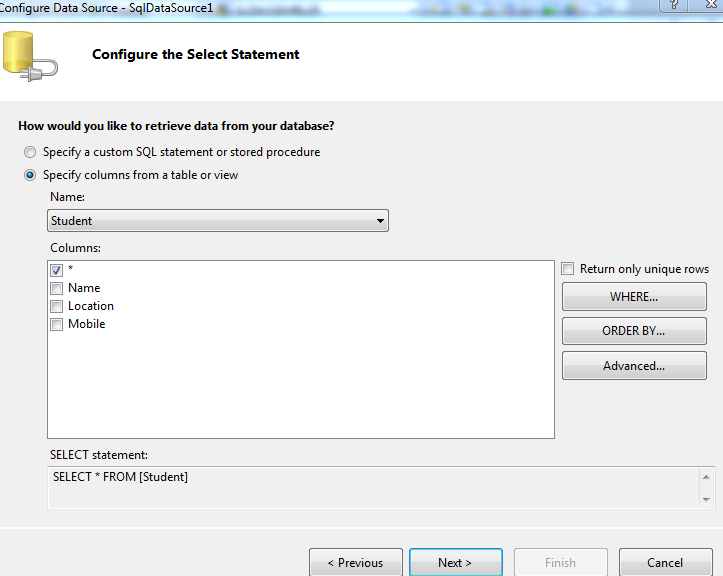
Step: 2 Now Add Database.mdf in your website-->Create table (student) and columns.For More Details..

Step: 3 Now click on ListBox -->choose Data Source -->Select a New Data Source-->Select Database -->OK-->choose Database.mdf and proceed with Next Button as Shown below:
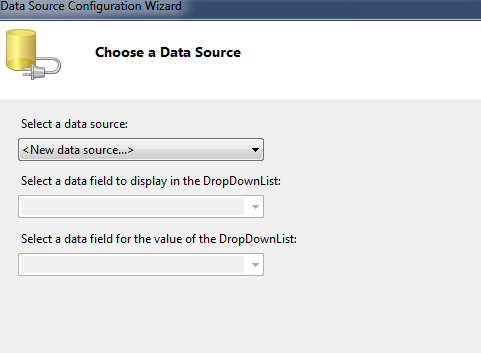

Proceed Next:-
Step: 5 Double click on Submit Button and Write the following codes.Which is given below:
using System;
using System.Web;
using System.Web.UI;
using System.Web.UI.WebControls;

public partial class ListBox : System.Web.UI.Page
{
    protected void Page_Load(object sender, EventArgs e)
    {

    }
    protected void Button1_Click(object sender, EventArgs e)
    {
        Label2.Text = "Hello " + ListBox1.SelectedItem.Text;
    }
}
Step: 6 Now Run the Program (Press F5).

2.) The DropDownList control:-
It is used to display the List of data from which you make single selection.This control comes under using System.Web.UI.WebControls Namespace.The DropDownList Control inherits the List Control Class.
There are some important properties of the DropDownList control.
Some properties are same as List Box Control Properties:-
- BorderWidth
- Bordercolor
- BorderStyle
- SelectedIndex
There are some steps to implement this control please follow it.
Step: 1 Add a New web form in your Solution Explorer-->Drag and Drop Label,Button and DropDownList control on the Form as shown below:

Step: 2 Now Configure the Data source as I have configured above in the ListBox control.

Step: 3 Now Double click on Submit Button and write the following codes.
using System;
using System.Web;
using System.Web.UI;
using System.Web.UI.WebControls;

public partial class Dropdownlist : System.Web.UI.Page
{
    protected void Page_Load(object sender, EventArgs e)
    {

    }
    protected void Button1_Click(object sender, EventArgs e)
    {
        Label2.Text = "Hello  " + DropDownList1.SelectedItem.Text;
    }
}
Step: 4 Now Run the Program (Press F5).
Output:

Output:
3.) The BulletedList control:-
It is a web server control which is used to display the items in the Form of a Bulleted List on the web Page.
There are some Important properties of the BulletedList Control :-
- Text :-It is used to set the text of the BulletedList control.
- AutoPostBack:-It is used to set the value of the AutoPostBack Property of the control.
- SelectedIndex:-It is used to set the currently selected item in a BulletedList control.
- SelectedItem:-It is used to set the currently selected item in a BulletedList control.
- SelectedValue:- It is used to set the value property of the selected List Item object of the control.
- DisplayMode:-It is used to set the DisplayMode of the List items appearing in the control.
- BulletedImageUrl :-It is used to set the Path to an image to display for each Bullet in the control.
- FirstBulletedNumber:- It is used to set the value that starts the numbering of the list in the control.
- Target:-It is used to set the target value when any user click the BulletedList control values.
There are some steps to implement this control please follow it.
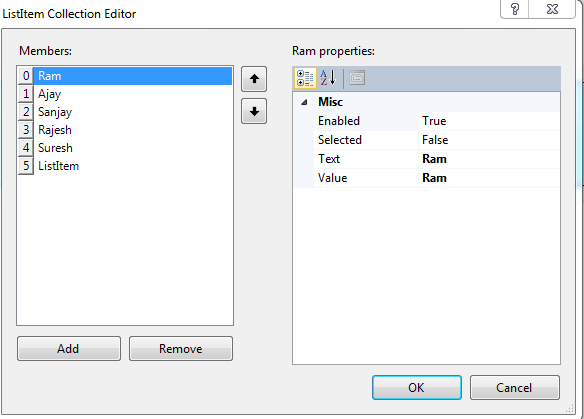
Step: 1 Drag and Drop BulletedList control from the toolbox-->Go Properties-->Items-->Add values as shown below:
Step: 2 Now Run the Program(Press F5)
Output:

Output:
4. ) The HyperLink Control:-
The HyperLink control is used to create a link for another web page,when any user click the link then he will redirect to another page.
There are some important property of the HyperLink control which are given below:
- Text:-It is used to set the Text caption for the HyperLink control.
- Target:-It is used to set the target value(page)when Hyper is clicked.
- NavigateUrl:-It is used to set the URL to link to a web page when the HyperLink control is clicked.
- ImageUrl :-It is used to set the path to be displayed for the hyperlinked control.
- _blank:- It is used to display the Hyper linked control in a New window without frame.
- _top:- It is used to display the hyperlinked in the full window without frames.
- _parent:- It is used to display the hyperlinked content in the parent frame-set.
- _Self:- It is used to display the hyperlinked content on the frame with focus.
There are some steps to implement this control please follow it.


5. ) The LinkButton Control:-
It is another web server control that is used to link the current webpage to another webpage.It is like as HyperLink control but there are some Differences :-
- HyperLink control just allows the Browser to Navigate to a New webpage.
- LinkButton control allows the browser to Navigate to a Ne webpage as well as we can also perform some action by handling the click and commands events of this control.
There are some important properties of the LinkButton control.
- Text:-It is used to display the text in LinkButton Control.
- PostBackUrl:-It is used to Navigate the page when any user click the LinkButton.
- CauseValidation:-It is used for validation of the LinkButton control.
- Validation Group:-It is basically used for Group Validation of the LinkButton control.
There are some steps to implement this control please follow it.


6. ) The CheckBox Control:-
The checkBox control creates check box that can be selected by checking it.All property
match with other controls which i have discussed above,So need to write again .
There are some steps to implement this control please follow it.
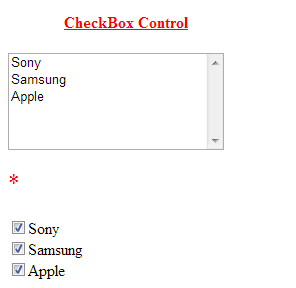
Step: 1 Drag and Drop Label , ListBox and checkBox control on the Form from toolbox as shown below-->Now go ListBox and each checkBox properties--> set AutoPostBack =True

Step: 2 Now Double click on each checkBox-->write the following codes which are given below:
using System;
using System.Web;
using System.Web.UI;
using System.Web.UI.WebControls;

public partial class CheckBox : System.Web.UI.Page
{
    protected void Page_Load(object sender, EventArgs e)
    {

    }
    protected void CheckBox1_CheckedChanged(object sender, EventArgs e)
    {
        if (CheckBox1.Checked == true)
        {
            ListBox1.Items.Add(CheckBox1.Text);
        }
        else
        {
            Label2.Text = "value is not added in dropdownlist";
        }
    }
    protected void CheckBox2_CheckedChanged(object sender, EventArgs e)
    {
        if (CheckBox2.Checked == true)
        {
            ListBox1.Items.Add(CheckBox2.Text);
        }
        else
        {
            Label2.Text = "value is not added in ListBox";
        }
    }
    protected void CheckBox3_CheckedChanged(object sender, EventArgs e)
    {
        if (CheckBox3.Checked == true)
        {
            ListBox1.Items.Add(CheckBox3.Text);
        }
        else
        {
            Label2.Text = "value is not added in ListBox";
        }
    }
}
Step: 3 Now Run the Program(press F5)
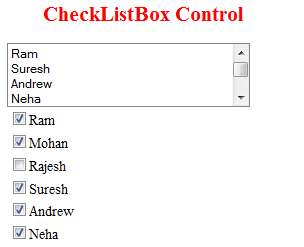
7. ) The CheckListBox Control:-
The CheckListBox control is used to display a number of check boxes at once in a column.
There are some steps to implement this control please follow it.
Step: 2 Now double click on CheckListBox control and write the following codes which are given below:
using System;
using System.Web;
using System.Web.UI;
using System.Web.UI.WebControls;

public partial class checklistBox : System.Web.UI.Page
{
    protected void Page_Load(object sender, EventArgs e)
    {

    }
    protected void CheckBoxList1_SelectedIndexChanged(object sender, EventArgs e)
    {
        for (int i =0; i < CheckBoxList1.Items.Count;i++ )
        {
            if (CheckBoxList1.Items[i].Selected)
            {
                ListBox1.Items.Add(CheckBoxList1.Items[i].Text);
            }
        }
    }
}
Step: 3 Now Run the Program(press F5).
output:
8. ) The RadioButton Control:-
The RadioButton Control is used as checkBox control on the Form.
There are some steps to implement this control please follow it.
Step: 1 Drag and Drop Label and RadioButton on the Form as shown below-->Now go Properties of the each RadioButton control -->set AutoPostBack=True.

Step: 2 Now Double click on each RadioButton -->write the following code which are given below:
using System;
using System.Web;
using System.Web.UI;
using System.Web.UI.WebControls;

public partial class RadioButton : System.Web.UI.Page
{
    protected void Page_Load(object sender, EventArgs e)
    {

    }
    protected void RadioButton1_CheckedChanged(object sender, EventArgs e)
    {
        Label2.Text = "welcome to "+ RadioButton1.Text;
        RadioButton2.Checked = false;
        RadioButton3.Checked = false;
    }
    protected void RadioButton2_CheckedChanged(object sender, EventArgs e)
    {
        Label2.Text = "welcome to " + RadioButton2.Text;
        RadioButton1.Checked = false;
        RadioButton3.Checked = false;
    }
    protected void RadioButton3_CheckedChanged(object sender, EventArgs e)
    {
        Label2.Text = "welcome to " + RadioButton3.Text;
        RadioButton2.Checked = false;
        RadioButton1.Checked = false;
    }
}

9. ) The RadioListButton Control:-
The RadioListButton control is used to display data as column of radio buttons.
There are some steps to implement this control please follow it.
Step: 1 Drag and Drop Label and RadioButtonList control on the form as shown below-->Now go properties of the RadioButtonList control-->set AutoPostBack=True.

Step: 2 Now Double click on RadioButtonList control-->write the following codes which are given below:-
using System;
using System.Web;
using System.Web.UI;
using System.Web.UI.WebControls;

public partial class RadiolistButton : System.Web.UI.Page
{
    protected void Page_Load(object sender, EventArgs e)
    {

    }
    protected void RadioButtonList1_SelectedIndexChanged(object sender, EventArgs e)
    {
        string s = RadioButtonList1.SelectedItem.Value.ToString();
        Label2.Text = "Lets play " + s;
    }
}
Step: 3 Now Run the program (press F5).
output:

10. ) The Calendar Control:-
The Calendar control is used to display a graphic calendar and any one can select dates on the web page.
There are some steps to implement this control please follow it.
Step: 1 Drag and Drop calendar control on web Form from toolbox as shown below:

using System;
using System.Web;
using System.Web.UI;
using System.Web.UI.WebControls;

public partial class Calender : System.Web.UI.Page
{
    protected void Page_Load(object sender, EventArgs e)
    {
        Calendar1.SelectedDate = DateTime.Now;
        Label2.Text = "you have selected Date and Time " + Calendar1.SelectedDate;
    }
}
Step: 3 Now Run the program(press F5).

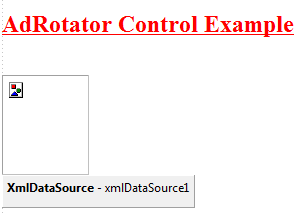
11. ) The AdRotator Control:-
The AdRotator control is very useful for Web Development.Whenever page refresh the image is change or go to another page.This control can be used to display images for Advertisement.Whenever page is refresh the image of AdRotator change automatically. This control can used Advertisement details either from an XML File or a Database Table.
There are some tags which are used in XML File.
- < Advertisement> It is used for the opening tag for XML.
- <Ad> This tag is used for each image .If we are using two images then we have to required two <Ad> tags.
- <ImageUrl> This tag is used to set the image path URL in Xml file.
- <NavigateUrl> This tag is used for Navigation of page after click event on the image.
- <Alternate Text> It is used to show the Alternate text ,if image is not display due to some reasons.
- <Impressions> It is used to set the priority of visibility of every image after the AutoPostBack event.
- <Keyword> It is used with keyword filter property of the AdRotator control.
There are some steps to implement this control on web form please follow it.
Step: 1 Drag and Drop Label and AdRotator control on the Form as shown below:
Step: 2 Now Open Solution Explorer -->Add New Folder(image) -->copy image from your Desktop and paste under this folder.


- Asp.Net coding Model
- Page Directive and Page properties in Asp.net
- Data Integrity
- Constructor and Destructor in c#
- Create a Setup File
- How to insert, delete,update and print operation in Data List control
- How to implement Data Mining concepts in asp.net application
- Real knowledge of multi threading concepts in c#
- How to implement date handling concepts in sql server
- WCF Concepts in asp.net
- How to add run time control in web page
- File Handling Real application
Click below for download whole application
Download
awesome thank you so much
ReplyDelete